How to Get a Custom Bathroom on a Budget

They say kitchens and bathrooms sell houses. Meaning, we should have run far away from this house and never looked back!!! We moved from a home that we dearly loved, two streets over, for the opportunity to get a little more interior space and a huge backyard (for South Florida standards, anyway!). While we are so thankful for the decision we made, I have to be honest and say that the whole renovation project felt like a mountain we could never get over. The entire house required extensive renovation to make it not only livable, but a space that we could ever feel at home in.
The timeline felt monumental. We lived with my parents for 5 weeks while the bedrooms, playroom, and master bathroom were completed, along with demo in the other spaces (just so we weren’t breathing in all of that!). We then “moved in” with construction plastic surrounding half of the house and basically walked around with construction-dust feet for another 3 months.
I am not a designer, nor have I taken any classes or even managed extensive renovation projects. We had always just done primarily cosmetic remodels, and only one room at a time. So while I felt overwhelmed at most points along the way, I also had a strong sense of the overall look I wanted for our home.
Simple. Understated. Timeless elements in the more permanent designs and some fun with things that could be updated down the road.
I knew we wouldn’t be replacing tile or redoing any of these spaces for years to come. With some of the other spaces we had remodeled, I had found myself already “tired” of the trendier looks I had chosen. So I knew that for this house, with the major investments we were making, I needed to keep it basic and go with overall design styles that have passed the test of time.
I also had a strong sense of wanting to keep an overall design that ran through our entire home. Since we had the opportunity to basically do everything at once, we really wanted it to have a seamless style, with each room having design elements that connect to the next room.
You can get a better idea of this from my home tours, found HERE and HERE.
Once the bedrooms, closets, playroom, and master bathrooms were completed so that we could actually move into our home, we moved on to the second tier of the renovation. The kids’ bathroom was the second priority, though it was being worked on alongside the kitchen.
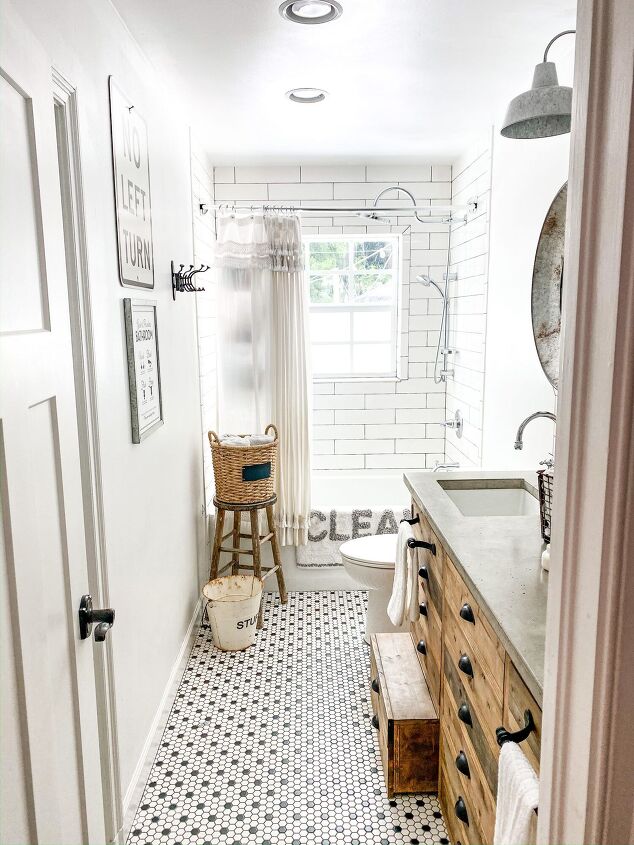
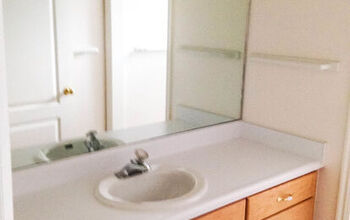
I had so much fun with the kids’ bathroom design. But to really appreciate it, you have to see this before:
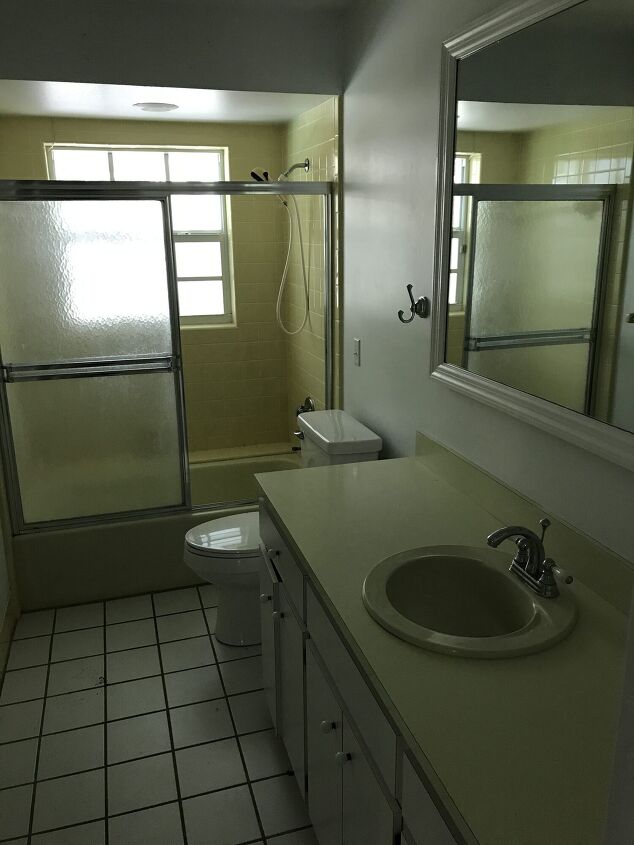
I mean, I don’t hate the color yellow, but it couldn’t have been more dingy and sad (maybe with the exception of the green toilet that had graced the master bathroom! Yikes!)
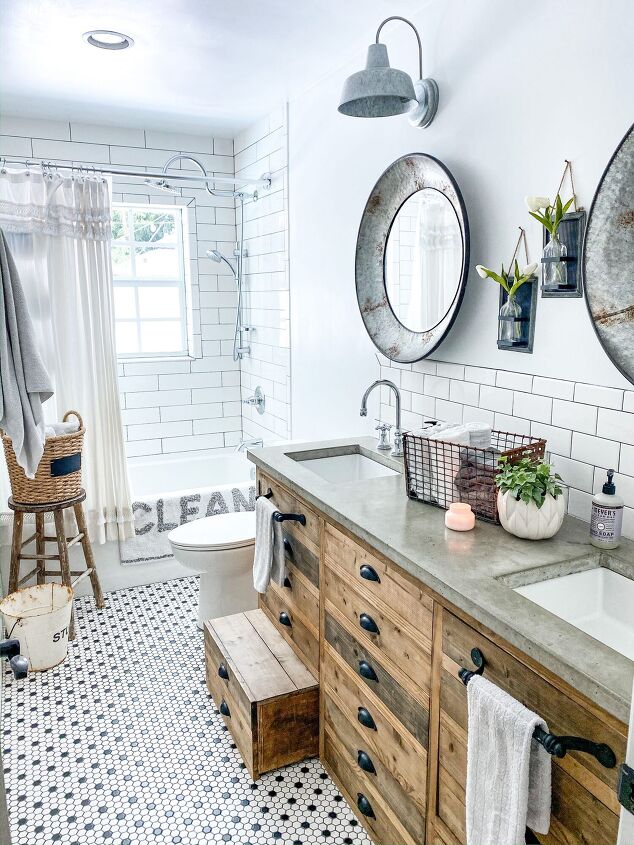
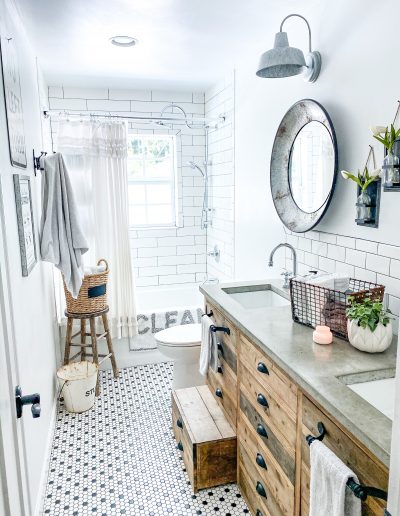
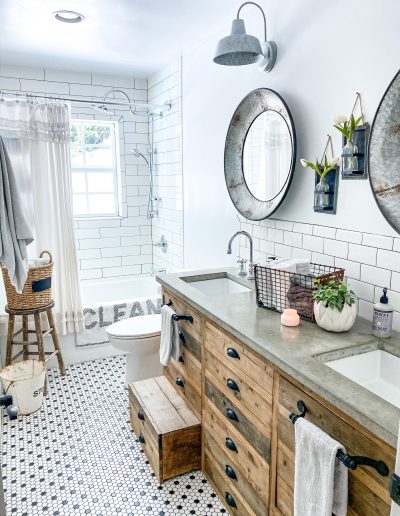
Throughout our home, you’ll find elements like subway tile, penny tile, wood, and concrete. I really wanted the more permanent elements, such as the tile, to be elements that have withstood the test of time.
Tile Flooring
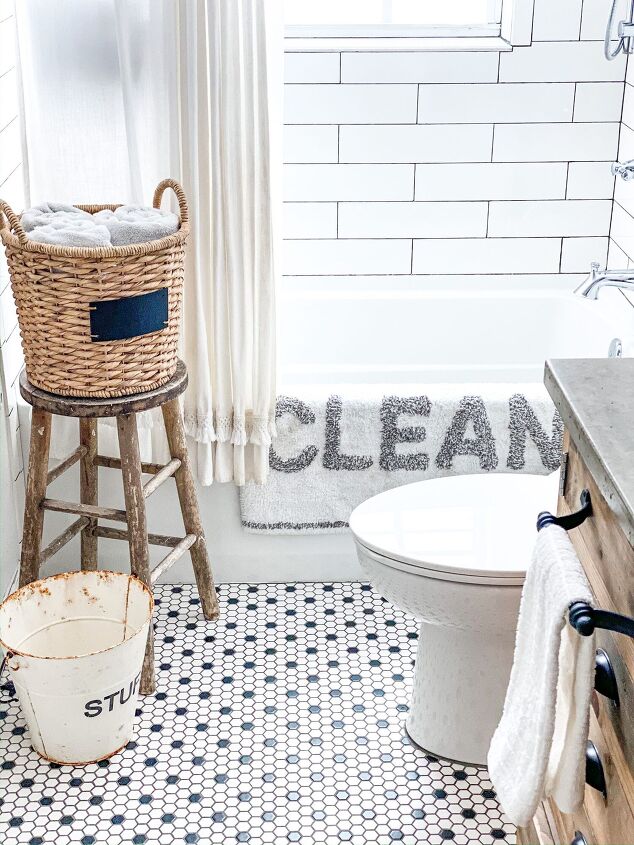
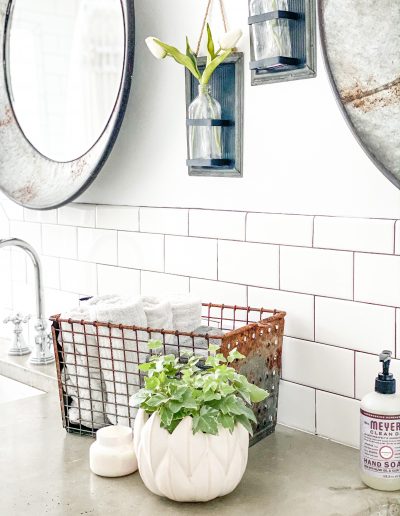
Penny tile has been around since the early 1900’s and because sickness spread so easily during those days, the bathroom tiles were often white, thought to be a more “clean” look. I can’t disagree with that! While penny tiles originated in the black and white color scheme, you can find them now in an array of colors and patterns. I personally love how black and white tile, especially in a simple pattern, can go well with whatever décor trends come and go over the next 20 years. And who knows…when it comes time to replace the tile…many years down the road…I may choose the same tile.
It says something about a design style that has been around for over 100 years and is still sought after! So I felt safe with that choice!
This tile was also a budget-friendly option. Available in pre-set 12” sheets, it was a fairly quick and easy tile job. If we had only been doing this one space, we would have tackled this project ourselves. However, we literally had tile work throughout the entire house, so we had a tile contractor. Especially since we were paying for labor, we were happy with a moderately-priced tile that allowed for easy installation, thus bringing the labor cost down too.
Tile Backsplash
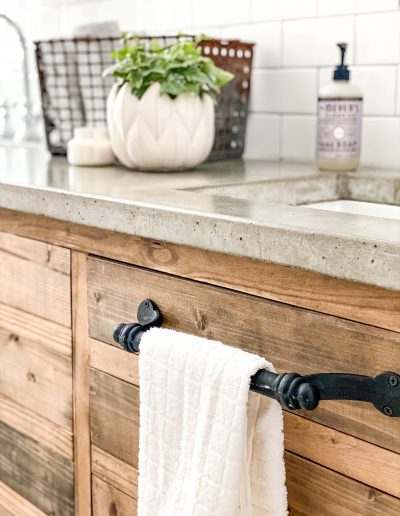
This is just a personal preference, but also one I recommend when offering advice to others who are doing bathroom renovations. If you have the opportunity, add a tile backsplash! I love that I can wash and scrub it clean, and it just feels like you can get it more clean than a regular drywall or wood finish. Because we were using subway tile in our kitchen, I chose to carry this design element through into the bathroom also. It makes a great bathroom backsplash, and with its straightforward installation and clean lines, it was also a budget-friendly labor cost. The subway tile itself is extremely budget-friendly too!
Subway tile is a nostalgic choice, but also one that has been around for a very long time! It dates back to 1904, when it was originally designed for the New York Subways. The clean lines and bright, white tile helped to reflect light and brighten up the underground areas and the Victorians were also obsessed with surfaces that were easy to clean.
I’m with the Victorians on this one!
Tile Shower Surround
Another budget-friendly way we renovated this bathroom, while keeping the overall design aesthetic, was to use the 16 inch subway tiles in the shower. We repeated this same concept in the master bathroom shower. The larger tiles made for a quicker and less labor-intensive installation. I am still SO HAPPY that we went with the dark charcoal grout for the tile throughout our home. With the hard water of our South Florida well, it has been a cleaning life-saver. I also appreciate the modern nod of the dark grout, but mostly, I chose it because I knew it would be easier to maintain a clean appearance over the white or light grout colors.
Bathroom Vanity
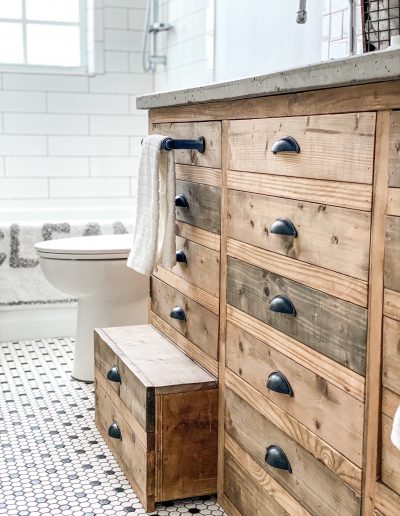
Several factors went into our decision to have all of our bathroom vanities custom built. First of all, we were able to get the maximum size for the space by choosing a custom build. The standard sizes would have either been too long for the space or shorter than what we could do as a custom piece.
Secondly, I had really specific ways that I wanted the bathroom vanity to function, knowing it would be a high traffic area, shared by three growing kiddos! Here are some custom features that help us immensely with organization:
Deep drawers: The center bank appears to be a column of narrow drawers. However this apothecary-style is faux! The center actually has three large, deep drawers. Each child has a drawer that holds pajamas, under garments, and personal effects, such as lotions, hair care, etc. Everyone has everything already in the bathroom when they go to shower and clean up!
Pull-Out Step: This genius idea came from a friend and we have been thrilled with it. The pull-out step has been so convenient for our younger children. Under each sink, there is a pull-out. Eventually, when all of our kids are tall enough for the sink and mirror, we can easily convert the pull-outs into drawers for more storage. By the point, I’m sure the girls will need more space for hair and make-up items!
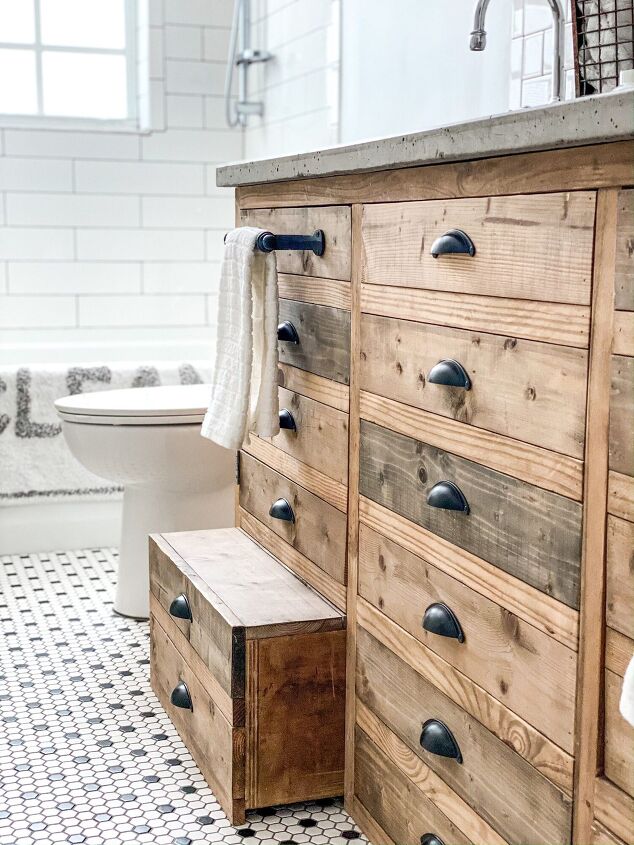
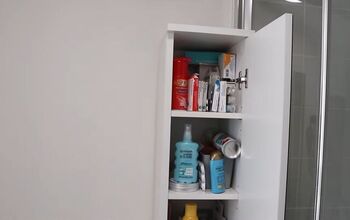
Large cabinet space: Under each sink is what appears to be more drawers, but actually opens to a large cabinet. This is the perfect bathroom storage space for pool towels, toilet paper, Lysol wipes, cleaning supplies, etc.
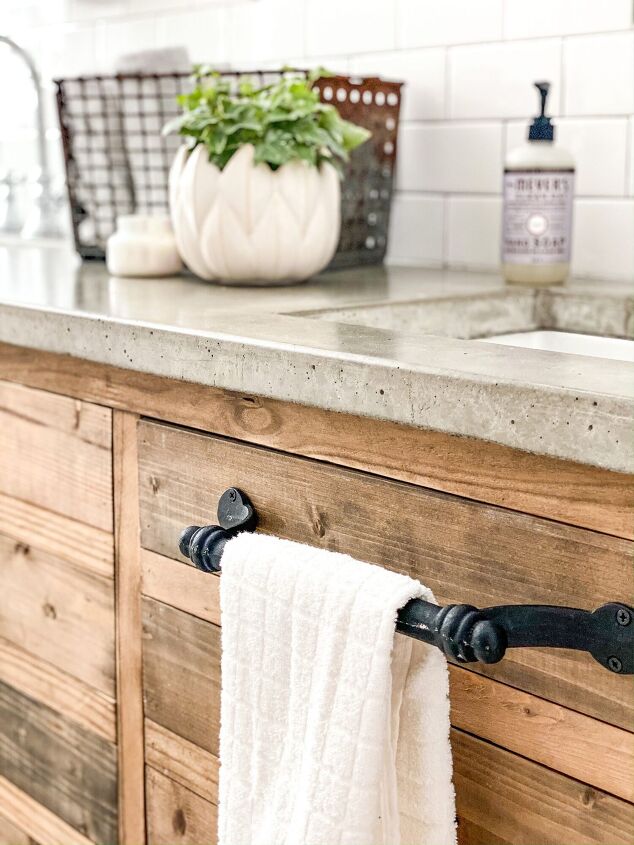
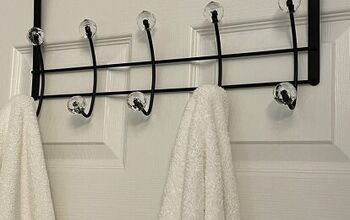
Large hardware for hand towels: I wanted the hand towels to be easily within reach for even our youngest and also be hung in a way that would be easy for the kids to switch hand towels when needed and keep it tidy. I find the rings to be tricky for kids (even my husband doesn’t seem to hang the towel straight on the rings!), so we went with these large barn-door handles from Magnolia Market. These are discontinued, but you can find a similar style HERE and HERE. We used these same handles on our laundry room doors and on the sliding barn doors in the playroom. They were a simple way to carry some consistency through the house!
Vanity Counter Top
I always have questions about our countertop! Our vanity was custom built by a local builder and they also built the countertop to go with it. There are lots of tutorials out there for DIY concrete countertops. Speaking from experience, good forms are important!. While we didn’t install these ourselves, I can say with certainty that I would definitely choose these over and over again. The natural imperfections of the concrete nod to the overall vintage feel of our home. The concrete material, itself, is so easy to maintain; you really can’t hurt it. If you’re on the fence about concrete countertops, our experience with them has been wonderful!
We also installed concrete countertops in our kitchen, yet another way to carry a consistent design style throughout our home!
Other Finishes and Décor
In a bathroom, my preference and recommendation is to not “play around” with tile and permanent fixtures. Consider keeping those high-quality and basic. You can change the entire look of your bathroom with less-permanent finishes, like mirrors, lighting, and décor.
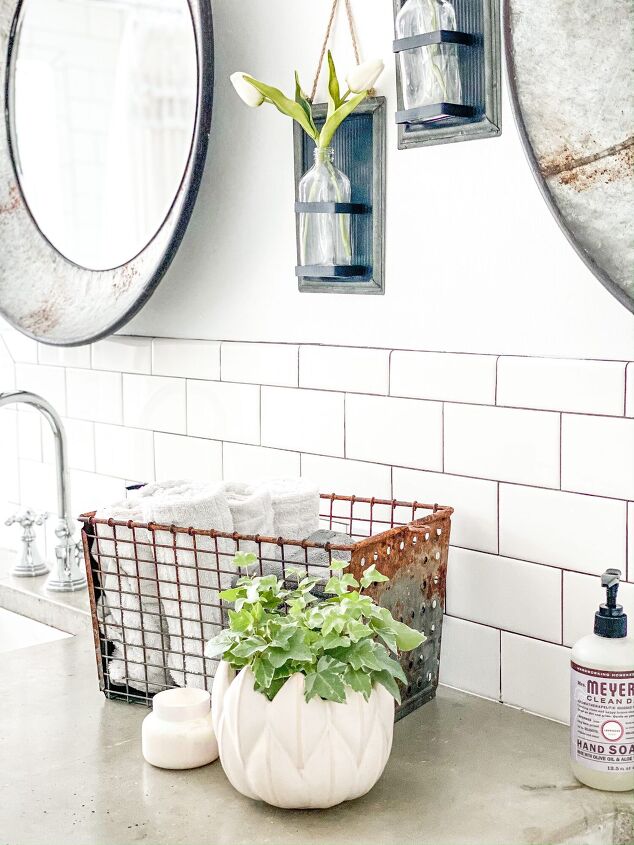
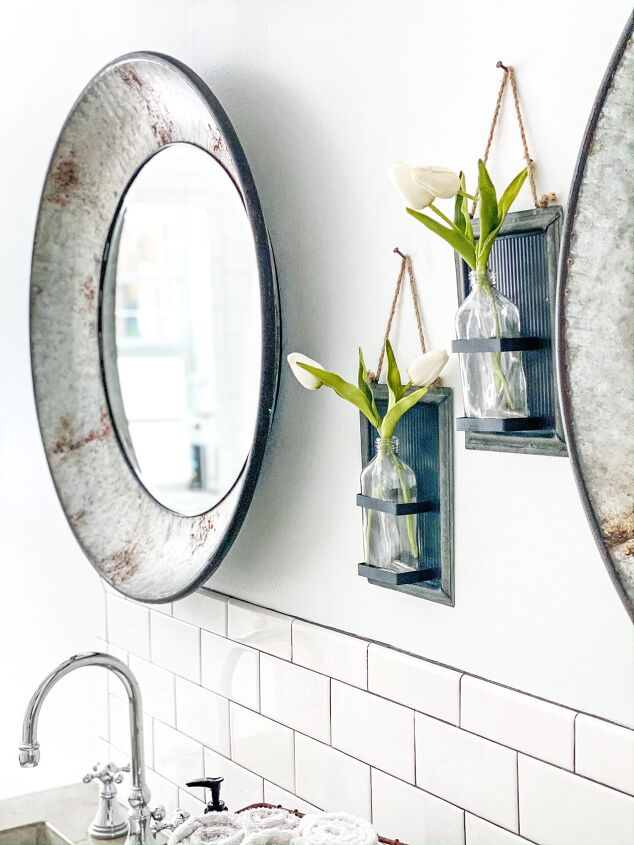
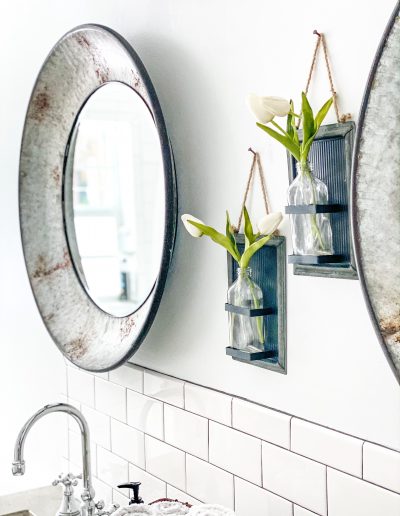
With everything so stream-lined in this space, I wanted to make a statement with the mirrors and play around with shape and texture. We found these mirrors at The Findery in Waco while on vacation there. (I say vacation…we were really escaping our home for part of the renovation!). I love how the galvanized metal ties in with the gray concrete and the round shape adds some variety. The mirrors are large enough for all practical needs in this space but also add a fun décor element.
Lighting is a key element and a place where you can have some fun! However, lighting can get extremely expensive! I was so very delighted to find these sconces for $30, coordinating with the mirrors and tying into the industrial farmhouse elements throughout our home. This particular sconce has been discontinued, but you can find a similar one HERE. Because we had plenty of recessed lighting added to this bathroom, the sconces could be a cosmetic touch rather than providing the lighting for the whole space. They do add a great addition to the lighting for make-up purposes and also a soft light when the recessed lights are off.
Bathroom décor is a topic that I’m kind of passionate about! LESS IS MORE!!! When you think about how quickly things get dirty in a bathroom (especially those icky germs that you can’t see), it really puts a limit on how much décor you may want to bring into a bathroom setting. For myself, I prefer to spend as little time cleaning in a bathroom as possible.
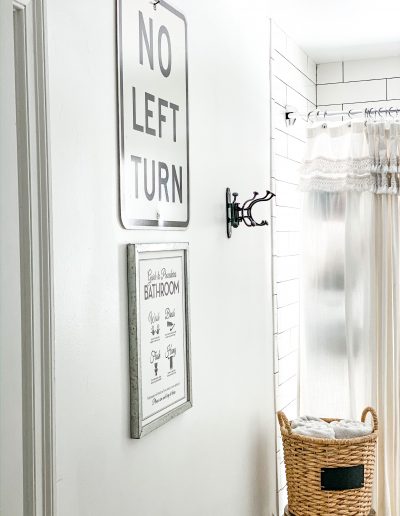
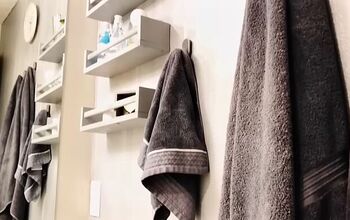
Therefore, I chose to keep all décor very simple and basically only on the walls. It is up high where it isn’t as prone to be a resting spot for germs. I used these simple wall vases, also from Magnolia Home, and can change those up seasonally. I’ve linked some great wall vase options HERE, HERE, and HERE! Otherwise, we added a cute little Hobby Lobby sign for 50% off and a vintage street sign from the flea market!
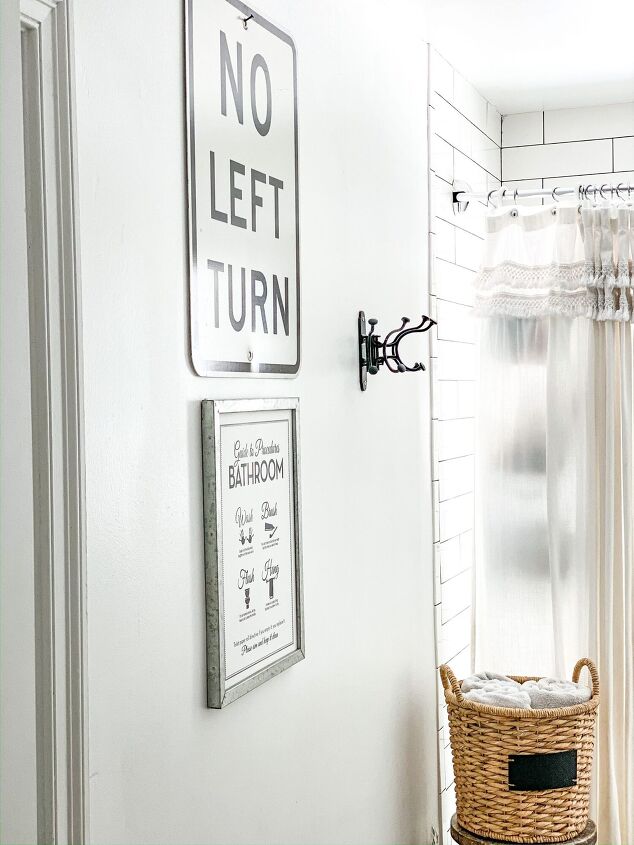
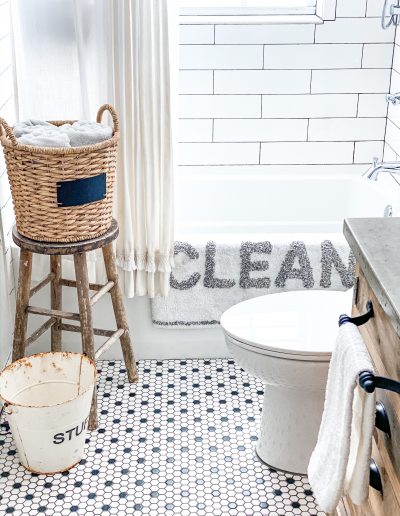
Containers and organizers are important in a bathroom setting. This vintage locker basket works great for holding extra hand towels and wash cloths, while also having a décor element. I keep a basket for towels and a cute bucket for trash. And that is it for bathroom décor!
A cute shower curtain and towels serve functional purposes while adding to the aesthetic of a bathroom. I chose all white, not because my kids are always clean and tidy, but because I can BLEACH THEM! Remember…I’m with the Victorians. Haha!
We’ve had this same shower curtain for almost four years now and it stays looking nice because I throw it in a bleach load every now and then. I replace the kids’ towels about once a year or so, always white, so they can be bleached. I have found that we don’t need a cabinet stuffed with extra towels. Keeping things like towels to a minimum forces my hand to keep up with the laundry and cuts down on the amount of storage space I have to keep available!
I picked up this cute bath mat recently and it’s my one departure from all-white. But for only $12, we will enjoy it while it lasts!
I hope this answers a lot of your questions about the kids’ bathroom renovation! I am still as happy with our design choices as I was four years ago, and for someone that likes to switch things up, that says a lot!
Most importantly, our decisions helped us stay on budget, while providing quality that will last us…and three kiddos… for many years to come!
Blessings,
Robyn
Gallery


Comments
Join the conversation
1.This reply to Cor22739790 - as a contractor, whenever we put concrete in a kitchen or bath, we use a 511 impregnator sealer (there are several brands to pick), at LEAST 4 coats. to really absorb into the pores of the concrete (it will NOT alter the appearance of the counter). Then, we use a product called Acrylacq - again, at least 4 coats. It will give you the shine you want, and it will last!! You will never regret doing more coats, and they just paint on super-fast with a foam paintbrush... then go do something else while it dries (make sure the counter is good and clean before you start!).
2. This comment is to Robyn: BEAUTIFUL! Truly, very nice work!! I am 100% in your camp (maybe with the Victorians? lol) that the permanent fixtures in a bathroom should be timeless. Anyone is gonna look at gray walls and go, "1990s..." or brushed brass fixtures ("SOOOOOO 2000s..."). Stay classic, and you'll never be dated. I, too, always just go with white towels. When there are kids and multiple bathrooms, no one ever wonders which towels go in which bathroom!! And, as contractors, we often come home *filthy* (yeah, it's so much fun crawling around in crawlspaces! NOT!!), so the bleach-ability factor is a definite plus! Oxy-clean in every load, for sure!!! But bleach is great in the linens rotation!
We're restoring a 1906 Craftsman bungalow right now on a Historic property we hope to get on the Historic Registry. Fell in love with Daltile's Restore in Bright White - they've recreated all of these tiles, difference sizes of Subway (with the great sharply cut edges, not the beveled! Much more true to the originals!), mini-hex tile sheets, etc. And they're available at Home Depot, so the price is wholly-reasonable! (There are more options at the Home Depot website, and you can either have them delivered to the store, or home-delivered, often for free!) For anyone trying this look, that is definitely a budget-friendly option; we're doing this remodel on a shoestring, maybe a thread budget (!), milling our own lumber, moulding our own crown, window, and door casings, patching in reclaimed flooring from an architectural salvage place. It's a labor of love... for the last 2 years...
Yes, living in a construction zone is tough (!!!) but when the payoff is a bathroom as beautiful as yours? WORTH IT!!! It's absolutely LOVELY!! And you're BRILLIANT to keep the jammies, etc., right In. The. Bathroom!!! *palm to forehead!* Thanks for the great post and beautiful pictures! ~Chrissie
Congratulations the whole thing does look pretty amazing...except for one tiny thing which of course is only my opinion so please don't be offended.
I'm old : ( but when I was young all the public toilets (in UK) especially the outside toilet blocks were all tiled with these white brick shaped tiles so Maybe I"m a bit traumatized by these memories : ) But as they say one man's meat is another man's poison. BTW I don't like coriander (cilantro) either : )
Hey it's your home and you did a great job...you should see my place : (