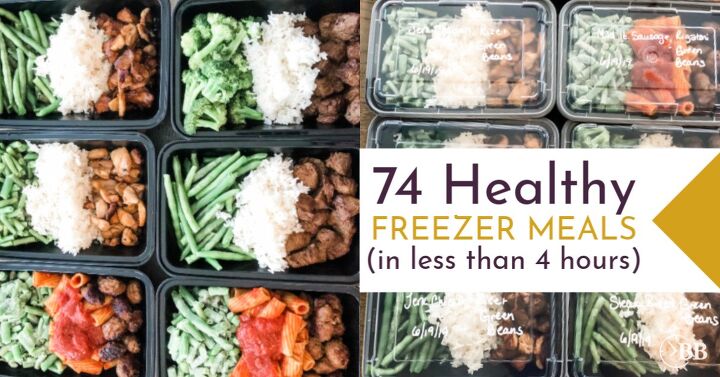
How to Make 74 Healthy Freezer Meals At Home in 4 Hours
If you’re looking for a super healthy meal plan, a way to put lunches and dinners on autopilot, then I’m about to blow your mind.
Update: 4/5/20 I know how stressful it is right now to be cooking 2-3 times a day while you’re also trying to work, “home school”, referee kids, and get your house under control. We created an epic inspiration binder of the easiest cheap meals. These ideas are field-tested by hundreds of thousands of our readers and are guaranteed to help even the most overwhelmed mom stick to a meal plan.
And we’re giving it to you 100% free right now so you can use it to help you get through this time. And bonus: You’ll end up using it long after the pandemic is over.
I’m going to show you how to spend 4 hours this weekend to make 74 pre-portioned healthy TV dinners using whole foods that can be frozen and thawed as needed. These are perfect to bring for lunch (and you can even toss the container when you’re done!) and super frugal!
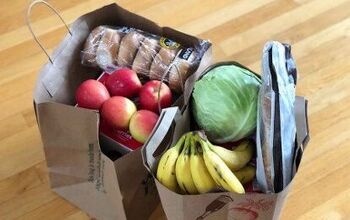
To feed our family of 4, we’re spending less than $100/week (including the cost of the containers and condiments!) on this program.
Heads up! If you’re struggling with meal planning, cleaning routines and home routines the FREE Home Rescue Challenge was made in honor of you!
We’re losing weight and eating a ton of vegetables, and I’ve spent no time cooking at all since we started. Each meal can be microwaved for 90 seconds (if it’s thawed) or on 50% power for 90 seconds and then 90 seconds on full power if it’s frozen.
First off, you should know that we’re practicing what we preach. We’ve been eating nothing but the meals I’m about to tell you about for a month and a half now. Our pantry is completely bare except for 2 bags of chocolate chips that I swear I’m going to make into cookies one of these days.
The secret to this meal plan is in its simplicity. By keeping to whole foods with just a few menu options that freeze beautifully, your prep time for full cooked meals is just a few minutes.
The Menu:
- Strip Steak, White Rice, Green Beans x 12 meals.
- Flank Steak, rice, squash x 12 meals.
- Grilled Chicken (plain), sweet potato, squash x 14 meals.
- Lemon Chicken, Sweet potato, green beans x 12 meals.
- Teriyaki Chicken, rice, broccoli x 12 meals.
- Ground Beef, sweet potato, broccoli x 12 meals.
Since this is what we’ll be making, I’m going to explain step by step how to prep this exact menu, but you can make easy substitutions as well.
Need step-by-step instructions for organizing your meal plan? Check out our FREE Home Rescue Challenge here…
Easy Substitutions:
- Italian Sausage with pasta and sauce (we did this last time and the kids love these! We mix the pasta with the sauce and then freeze and they thaw beautifully)
- Salmon
- Tilapia
- Chipotle Chicken
- Carrots
- Asparagus
- Brown Rice
- Mashed Potatoes
- Sweet peas
The first purchase we’ll make is the containers for the meals. You’ll need to order these at least a week before you need them. They’ll last you for 2 sessions and are absolutely worth the cost.
The containers can be reused or disposed of after use. We reuse the ones at home and Jon throws them out if he takes them to work (because he never, ever remembers to bring them home). In fact, because these can be heated from frozen, he usually just takes a frozen meal straight to work and doesn’t even pack a cooler (since it’s a short trip to the office).
You can order the containers here. Be sure to get the one that says “your selection”: the “recommended product” that they show doesn’t have tops. The cost of the containers is included in the $100/week price tag.
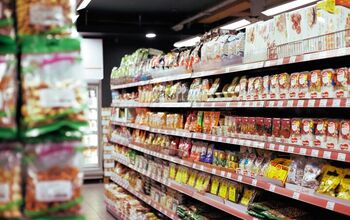
Speaking of price, our food was purchased at Wegmans in Northern Virginia, so your prices may be a little higher or lower. We didn’t use coupons or sales, so you can likely do a lot better. In fact, we didn’t even use Ibotta since my husband forgot about it!
Each meal will have pre portioned-serving sizes, which is so awesome if you use MyFitnessPal to count calories because every single meal has the same calorie count and can be quickly added.
Serving sizes: 5 oz meat, ½ cup carbs (rice or potato), ½ cup veggies in each plate.
With 74 meals, we can feed 2 adults and 2 children for 2 weeks. The kids (both toddlers) split a meal and have lunches at their preschool program during the week. Usually, my husband finishes up whatever they leave.
You can actually add breakfasts to this easily, but choose another day to cook those. I do 20 protein pancake and turkey sausages for the freezer as well, and we have oatmeal and freezer breakfast sandwiches. The cost of these cheap breakfasts fits within in the same $100/week budget.
If you’re only feeding yourself, you can eat for 3.5 weeks on this.
Total Ingredients Needed:
For price savings, I recommend you consider purchasing these at Costco.
Below weights are adjusted for weight lost when cooking. So when you’re all done, you’ll be able to measure out 5 oz of meat.
- Strip Steak- 70 oz (Bones will mess up weight- try to get boneless) (4.37 pounds)
- Flank Steak- 70 oz (bones will mess up weight- try to get boneless) (4.37 pounds)
- Chicken Breast- 190 oz (11.88 pounds)
- Ground Beef (low fat)- 70 oz (4.37 pounds)
- White Rice- 22 cups
- Sweet Potatoes- 22 cups
- Green Beans- 15 cups
- Broccoli- 15 cups
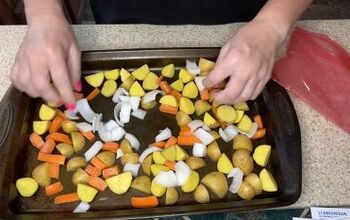
- Squash-17 cups
To save both time and money, we bought frozen vegetables in bulk to add to the meals.
We were able to buy pre-marinated chicken, but you can also buy a bottle or create your own.
Goal Budget:
$160 (for 2 weeks) + $32 for 74 containers with lids (you need to buy 150 of them at a time since they are only sold in bulk, so we have enough for a month).
If you really need to save money, that gives you $8 to spend on breakfasts while still keeping in your $100/week budget. Your best bet is oatmeal, cereals, and bananas. This gives you plenty of room to go over and still likely save money from your normal grocery routine.
Helpful equipment:
You don’t necessarily need to buy these the first week, but if you end up doing these a few weeks in a row, reinvest your savings into better equipment.
- An electric griddle
- An in oven meat thermometer
- Giant food prep bowls.
- Cooling sticks: They help cool the food quickly so it doesn’t heat up your fridge.We’ve been doing this for a while without them, but we plan to buy these for the next batch.
- A large cutting board
- Food scale
- Large capacity pot
- Deep freezer.
Prep:
Total prep time should be 3 hours. Plan for 4 hours your first time just in case it takes you a little longer to get the hang of.
If you have an electric griddle, fire it up. If not, heat a frying pan and preheat the oven to 350.
Brown the sides of the steaks, then place them in baking dishes and bake in the oven (with the meat thermometer set to alarm when it hits the right temperature).
As the steaks get close to finishing, start the chicken, browning on the griddle and then baking to temperature.
As meats finish in the oven, they get moved to a large bowl to cool for a few minutes and then straight into the fridge to completely cool.
As the last of the meat goes into the oven to cook, make the rice and sweet potatoes. We cube the sweet potatoes and boil, but you can also mash them.
By the time your last meat is ready to go into the fridge, your starches are done and the first of the meat is cooled.
Grab your cutting board, and dice the meat up into small bites (you shouldn’t need a knife to eat these meals- each piece should be bite sized). Lay out your containers (so 12 containers for strip steak – refer to the guide above to get the numbers right) and measure out your meat. You can use the food scale to get exactly 5 oz each or you can just equally divide them if you don’t have a food scale.
Then use a ½ cup measuring cup to portion out the carbs (Jon sprays a bit of cooking oil on the measuring cup so the rice doesn’t stick), and finally add a ½ cup of veggies (it helps if you have two ½ cup measuring cups).
Stick the tops on and move them to the fridge.
Keep going until all of the meals are frozen or in the fridge.
Storage:
We keep 2 days worth of meals in the fridge at a time and then move new meals to the fridge every day. We have a small deep freezer (the cheap $150 ones) and a normal freezer, and 74 meals take almost all of our freezer space.
If you only have your normal freezer and it’s filled with tater tots, you’re going to have a hard time doing this for more than a week at a time. It still may be worth it to you, but I’d invest the $150 in a deep freezer if you can because the best part of this is not having to cook a single thing for 2 weeks. (It’s AMAZING!)
There you have it.
Cheap.
Easy.
Healthy.
The only downside is that eventually, you’ll get sick of having the same meals over and over. We’re on a month and a half and still haven’t hit that yet, but I’m sure it’s coming. It’s so nice not to have to cook at all, though. We’ll start adding in our favorite freezer meals from $5 dinners once we start getting sick of eating the same thing.
But this has been an awesome boost for our waists and our wallets!
P.S. If you’re ready to finally get your budget under control, you can sign up for our FREE 90 Day Budget Bootcamp and we’ll walk you through the 3 simple routines that will change everything about the way you manage your home routines.
How would this help you? What would you do if you didn’t have to cook at all for two whole weeks?! (And lost 5 pounds!)
FTC Disclosure of Material Connection: In order for us to maintain this website, some of the links in the post above may be affiliate links. Regardless, we only recommend products or services we use personally and/or believe will add value to readers.


Comments
Join the conversation
I live alone, also in N. VA, and also meal prep. These meals are great ideas! Now that the weather is changing, I also like to add soups, chili and cassaroles into the mix, all of which freeze well, too, and are cheap and easy to make. The key is having a variety, so you don't get tired of anything, especially if you live alone (I LOVE chili, but don't want to eat it, or anything else, for a week! LOL!).
Thank you so much for this. I've read so many articles on how great it is to make ahead and freeze. I agree! Problem is, they are general in nature. What you've done is not only brilliant, it is so freaking helpful! With meal planning, especially doing a lot of meals, the deterrent is it takes too much strategizing! I'm already overwhelmed. Your step by step instructions are soooo helpful. Eternally grateful here.