DIY Van Servicing: How to Service Your Own Van & Save Money

Today, I'm going to show you how to service your own van and save money. My dad is a retired mechanic, with 40 years of experience in van servicing. He's here to help me show you how to do a full service.
What do you need to get started?
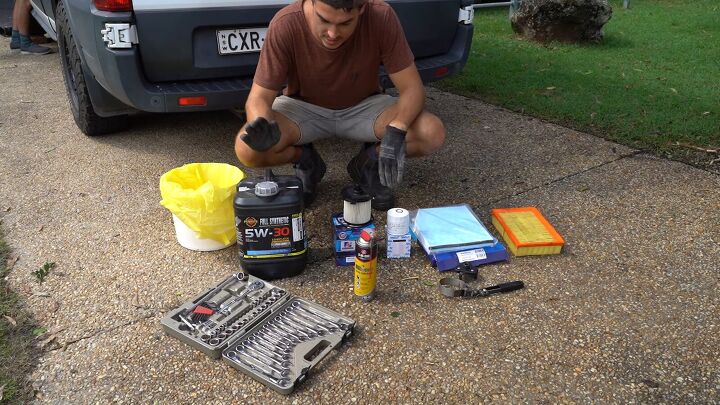
You’ll need oil, a fuel filter, an oil filter, a sump plug washer, a pollen filter, and an air filter. Silicon spray will be used for the final touches to make everything run more smoothly.
As far as tools, you’ll need oil filter removal tools, a socket set with some spanners ,and a bucket to collect used oil.
So, we've got a double bagged plastic bucket with a lid. We're going to fill it up with the oil, waste oil, and the diesel from the diesel filter, and then dispose of it in the oil disposal place in town.
How often should you do van servicing?
Ideally, van servicing should happen every 5,000 mile, but it really depends how much you drive. If you drive a lot in a year, you can go 6,500 before changing the oil. Otherwise, you can use your service book as a guide to what has to be replaced at every stage: air filter, fuel filter and pollen filter.
Changing the oil filter
I’ve driven the van onto a pile of bricks, just to get a bit more clearance underneath. If you do have jack stands, you can use them instead. I’ve also put some logs behind the back wheels, so that the van can’t roll forward.
To drain the oil, first, find the sump plug and open it. Get your bucket ready because the oil will pour out, and if you are careful, you won’t get any on your hands. Keep pressure on the sump plug as you turn it, then pull the screw out and let the oil pour out.
Now, replace the oil filter. I’ve prepped the new one by rubbing fresh oil around the o-ring. This will make it easier to take off in the future.
Use the oil filter removal tool to take off the old filter. Then, screw on the new filter tightly with the tool.
Next, replace the sump plug washer with a new one. It’s a rubber o-ring in this particular van. Then put the sump plug back in place in the van.
Put the old oil filter in a milk jug or something similar and use a screwdriver to bore some holes in it to let the oil drain out before throwing it away.
Replacing the oil
Now, fill the oil back up. Don’t forget to clean the oil cap if it’s dirty. We used fully synthetic oil, which is more expensive, but it’s premium oil.
To fill up the oil without spilling, you can make a funnel from a drink bottle.
Fill up the van with oil. According to the service menu, this van takes 10.1 liters (2.7 gallons). Check the dipstick to make sure it’s filled up all the way.
Changing the fuel filter
Next, undo the electrical connection for the water sensor.
Get your bucket ready, then use a wrench to remove the filter.
Take the o-ring off the field filter cap and dispose of it. Oil up a new o-ring, and replace it onto the cap inside the groove.
Replace the filter. Click it in place. Then screw the whole lot back into the van and plug the water filter sensor back in.
Check the diff oil
Use a 3/8 ratchet to open the diff oil’s conical plug and see if any oil comes out.
Twist a non-metal cable tie to make a right angle (to stop it from falling in). Now, stick it into the diff oil until it touches the bottom, and then pull it out. Look at the cable tie to check how high the level of diff oil is. Also check that the oil isn’t too watery, which can happen when there is a lot of flooding.
If the plug is dirty and has bits of metal on it, clean it off, before replacing it.
Check the manual transmission oil
Find the manual transmission at the front of the van. Unscrew it, dip a plastic cable tie into it to check the oil, then put the cap on again.
Changing the pollen filter
So the next thing we're going to change is the pollen filter. It’s normally under the glove box, by the heater, or the air conditioner.
Push down on the two little tabs and the whole glove box comes down. Pull off the cover, and pull out the old filter.
You can see the difference between a new filter, and one that has had quite a bit of use. Put the new filter in, and close up the glove box.
Changing the air filter
Find the air filter under the hood on the right side. Disconnect the intake hose and pull out the air filter cover.
Clean out the air mass flow meter. The meter has a sensor that tells the van about the air and temperature.
Inside is a tiny wire, which needs to be cleaned with a special air mass meter cleaner.
Replace the filter, and click it back into place.
Checking the hood
Make sure the hose connections are clean, the coolant level hasn’t dropped, and that no hose connections are corrupted.
Twist the air-conditioning belt slightly to check for cracks. If there are cracks, it needs to be replaced.
Clean out the drain at the top of the hood, because it can fill up with leaves and dirt, and allow water to enter the engine.
Finishing up
Silicon spray your window glides. This will make your windows go up and down more smoothly and last longer.
It's a good idea to test your wiper blades as well. If there are issues, you can replace them at any automotive store.
Check your lights: indicators, tail lights, stop lights, reverse lights, number plate lights, high beams, low beams, and fog lights. Our van has a spotlight as well.
Put the oil sticker onto the windshield.
DIY van servicing
And that’s all. What van servicing do you do to keep your van driving smoothly? Let us know in the comments.











Comments
Join the conversation