How to Make a Mini Greenhouse From Recycled Materials
How to make a mini greenhouse from recycled materials. This DIY seed starter is an inexpensive way to start your seeds to save a lot of money during planting season. Depending on your area and zone, you'll need to start seeds early, so start saving supplies to make yours.
We have a large garden because we like to grow our own food for canning and freeze drying. The first year, we bought plants for the garden.
When you're planting a few plants for a small garden, buying plants isn't too bad. However, when you're bringing home 100s of plants, the cost can be a little scary.
After that, we started planting some seeds to save some money. Again, I didn't want to drop $100s in supplies for seed starting, so we look for ways to make a miniature greenhouse DIY with recycled materials.
This is also a fun project for homeschooling. My kids are reluctant gardeners, but I am making sure they know how to grow their own food.
We've learned many things about the world in the last two years, but I never thought that we'd ever have to rely on growing our own food in my lifetime.
For more gardening tips and ideas, check out these posts:
- Gardeners Exfoliating Hand Soap
- How to Get Rid of Weeds Naturally
- How to Do Container Gardening With Herbs
- How to Dry Tea Herbs From Your Garden
- How to Grow an Herbal Tea Garden Indoors
- Natural Homemade Bug Repellent
- How to Use Natural Insect Repellent for Garden
- 7 Best Vegetables to Grow in Containers
- How to Make a Bird Seed Wreath
- How to Make a Mason Jar Bee Feeder
- Vegetable Container Gardening for Beginners
- List of Perennial Herbs
There are several ways to make a mini indoor greenhouse DIY. I've seen some really creative ways to make them!
I also used paper rolls that I saved. With a family of 5, there's no shortage of those!
We used to start our seeds in small seed pots in trays and set them on a table near a window. This did work okay, but this DIY seed starter gives better results.
Ideally, a large outdoor greenhouse would be the best place to start seeds. However, that is a large investment. This indoor mini greenhouse DIY is free to make with recycled supplies.
Greenhouses, and even a miniature greenhouse DIY, work by keeping the soil and air warmer. This helps the seeds germinate.
Since you use clear plastic containers, they let the sunlight come through the container. This can eliminate the need for lights if you place the seedling greenhouse DIY near a window.
You can also use this DIY seed starter outside. When the weather starts to get warmer, you should move the greenhouse outside for an hour during the middle of the day.
Then gradually increase the amount of time that you keep it outside to acclimate the plants to the outdoors before planting.
You can grow pretty much anything in your mini indoor greenhouse DIY. We use it mainly for peppers, cucumbers, spinach, lettuce, and tomatoes.
Basically, we use the seedling greenhouse DIY for anything we want to plant in the ground as a plant and not from seeds.
Did you know that you can get heirloom seeds on Etsy? There are several sellers, and you can often save a lot on shipping and get smaller quantities.
Yes, a miniature greenhouse DIY does need ventilation. If you close the lid tight, the plants may get too hot. The plants can also get too much of some gases in the air.
While a large greenhouse requires vents, this seedling greenhouse DIY is easy to vent. Simply cut some holes in the lid or don't close the lid fully. You can place a pencil or a spoon under the lid to prop it open slightly.
Ideally, your indoor mini greenhouse DIY should get 6 hours of sunlight a day. I set mine on a table in front of the window.
If there are shadows, just move your DIY seed starter containers around every few days so they get the sun.
Using your seedling greenhouse DIY is very easy. You'll make the greenhouse and start your seeds. Each zone has its own best planting times, so be sure to use a calendar to figure out when to plant.
I have a seed starting schedule in my gardening planner. This helps you keep a record to reference year after year.
After you plant, you'll need to water your seedlings daily. They don't need a lot of water, but the soil should stay moist pretty much all the time.
Learn about the best way to water a vegetable garden.
Other than that, the seeds will be fairly self-sufficient. You'll need to make sure they don't get too cold and have plenty of sun.
A few weeks before planting, you'll want to take the miniature greenhouse DIY outside so the plants can get acclimated. Set them outside for an hour a day and gradually increase the time each day.
Here are some tips to help you learn how to make a mini greenhouse from recycled materials:
- If the cardboard tubes fall over, set newspaper on the bottom of the container for support.
- Use a seed starting mix and not potting soil. Seed starting mix has better drainage and holds water better.
- Don't use soil from your yard or garden. It can have microbes in it that can cause disease or kill a young plant.
- Read the planting directions for each type of seed to see how deep to plant your seeds. If they are too deep, they may not be able to grow to the surface.
- Set your indoor mini greenhouse DIY in a warm location. They do need sun, but if your house is cold, it's important to keep them warm. You can set them on top of your fridge for more heat.
- Water the seedlings daily. They only need a little bit of water; enough to keep the soil moist.
- Once the seeds sprout, they do need sunlight. You can use natural sunlight by a window or fluorescent lights placed 1 to 2 inches above the plants. You can also use an LED grow light.
- Seeds like warm temperatures to germinate. However, young plant sprouts like it a little cooler. They can handle temperatures in the high 60s.
- Your sprouts are ready to plant when there are two sets of leaves. If you planted two seeds in each tube, plant the one that looks the strongest and discard weak plants.
- A week before you want to plant, move your DIY seed starters outside for an hour during the hottest part of the day. The next day, set them outside for two hours. Increase the time each day so the plants are acclimated to the outdoors.
- I recommend using heirloom seeds because you can save the seeds from the food you grow.
You will need the following to make a seedling greenhouse DIY:
- Clear plastic containers with a lid. I used salad containers, but you can use any clear container with a lid. Strawberry containers are also good to use.
- Seed starting mix
- 18 paper tubes
- Popsicle sticks or other markers
- Spoon or small shovel
- Scissors
- Sharpie marker
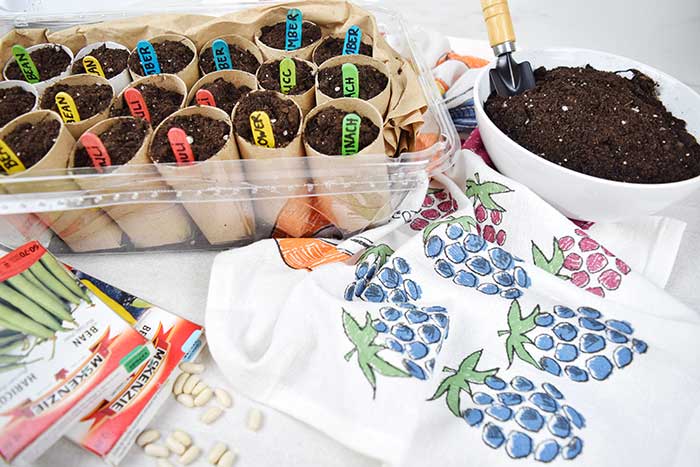
Cut the cardboard tubes so they will fit inside the plastic container with the lid closed. Make four 3/4 inch cuts on the bottom of each tube.
Fold over the flaps you just made on the bottom of the tubes. Fold them in a circle and place the final one under the first one to secure it.
Use a spoon or small shovel to fill the tubes with dirt. Place the tubes in the plastic container.
Cut the popsicle sticks in half and use a Sharpie to label the name of the plant.
Step #5Place the seeds in the soil, planting at the correct depth for your seeds. Mark with a popsicle stick.
Keep your DIY mini greenhouse seed starting in a warm location until the plants sprout. Close the lid on the container to trap in humidity and heat.
Step #7When the plants are ready to plant, remove the cardboard tubes and unfold the bottom of the tube. You can plant the entire tube in the ground because the paper will decompose.
Now you know how to make a mini greenhouse from recycled materials. Not ready to make a DIY seed starter? You can also buy mini greenhouses to use.
Like this Post? Pin it!
How to Make a Mini Greenhouse With Recycled Materialsprep time: 15 Mperform time: 1 hourtotal time: 1 H & 15 MHow to make an easy and inexpensive mini greenhouse to start seeds.materials:
- Clear plastic containers with a lid. I used salad containers, but you can use any clear container with a lid. Strawberry containers are also good to use.
- Seed starting mix
- 18 paper tubes
- Popsicle sticks or other markers
- Sharpie marker
- Spoon or small shovel
- Scissors
- Cut the cardboard tubes so they will fit inside the plastic container with the lid closed. Make four 3/4 inch cuts on the bottom of each tube.
- Fold over the flaps you just made on the bottom of the tubes. Fold them in a circle and place the final one under the first one to secure it.
- Use a spoon or small shovel to fill the tubes with dirt. Place the tubes in the plastic container.
- Cut the popsicle sticks in half and use a Sharpie to label the name of the plant.
- Place the seeds in the soil, planting at the correct depth for your seeds. Mark with a popsicle stick.
- Keep your DIY mini greenhouse seed starting in a warm location until the plants sprout. Close the lid on the container to trap in humidity and heat.
- When the plants are ready to plant, remove the cardboard tubes and unfold the bottom of the tube. You can plant the entire tube in the ground because the paper will decompose.




Comments
Join the conversation
I used paper towel rolls in a plastic container just like you did, however, they all got moldy after about 4 days. I was so disappointed.