How to Organize a Workshop: 8 Simple & Efficient Storage Ideas

Today I'm going to give you a tour and show you how to organize a workshop. There are a lot of different tools and materials that we use and ways that you can store them. We use simple workshop organization ideas to keep everything neat and easy to find.
1. Racks
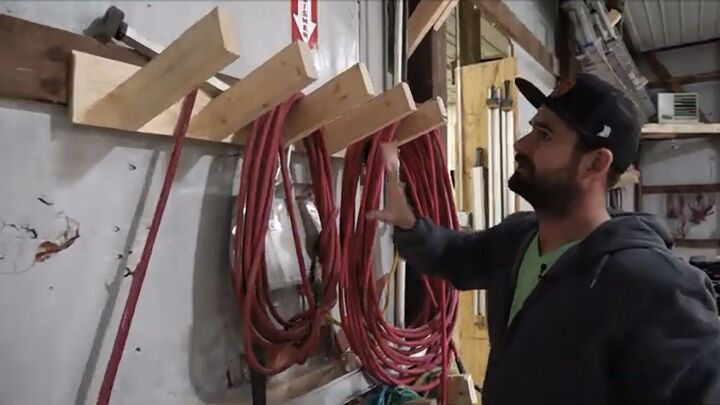
One of the ways that we keep all of our hoses, cords, brooms, mops,
and levels organized is by using some very simple racks we made from two-by-fours.
We cut the racks at a 20-degree angle and screwed them to the back of a piece of wood. You'll have a piece of wood for the back and protruding racks attached to the back piece. We screwed the entire rack right to the wall.
We take our brooms and put little pieces of wire on them to make a loop for hanging.
Then we just put some screws on the wall, and we hang them. This is a very inexpensive, simple way to get everything off the floor and organized.
2. Numbered garbage cans
Another cool thing we do is with our garbage cans. They're numbered. For example, the garbage can with a number two has a corresponding circle on the ground with a number two.
All the garbage cans have wheels on them. These might move around throughout the day, but when it comes time to clean up, it's very simple to know where everything goes back to where it started.
3. Lumber rack
We use a lumber rack. We run two by fours up, then we put some sideways, and run them on an angle, so all the material just lays right in each section. This is just two by fours, all different ways.
4. Power wall
When it comes to our tools, like our power tools, we like to keep them on our power wall. There's an outline of the tool shape with the name written inside. When a tool returns to its place, it fills the profile.
At the end of the day, when we're cleaning up a jigsaw, we wrap up the cord, and then the jigsaw goes right back into its place.
This is an excellent way to know what's out on the floor and what we need to look for. If something isn't filled, then we see that it's out on the floor and needs to be returned to its spot if it's done being used.
5. Cubbies for screws and nails
We have everything labeled in cubbies when it comes to our screws and nails section. We made these cubbies out of plywood. This way, somebody can take the whole cubby if they need a particular type of screw or nail.
We have different boxes for different things, like bolting walls down. You would take that box over to the house with all of our bolts and fasteners for bolting the house and attaching it to the trailer.
6. Don't stack tools
When we're organizing hand tools and power tools, one of the recommendations I will make is you want to make sure that things aren't behind something else. Keep everything in a plain line of sight.
We have some shelves for power tools, but only one power tool can go in front and nothing can go in front of that tool. When it comes to working throughout the day, it becomes very efficient to find things.
7. Keep things in corners
We also try to keep all of our ladders in one area because,
again, nobody likes to look for things. Same thing with our mover dollies. We keep all those in a corner too.
8. Workshop office organization
Our office is our command center. This is where we work throughout the day. We try to keep things very simple. One of the things we did to create a desk was to use one big counter made from shelving racks that you can buy at your local home store. Then we just put some pieces of wood up above as shelving.
How to organize a workshop
Hopefully, you were able to get tips to use in organizing your own workshop. Some of these things we do to organize our workshop keep things very efficient throughout the day and make us very productive.
Remember, an organized workshop is efficient; you'll be more productive when you can easily find what you need.










Comments
Join the conversation