How to Do a DIY Electric Bus Conversion & Take a Skoolie Off Grid

Wondering how you can turn your skoolie into an off-grid bus? Well, today I am going to show you how we did just that! Read along to find out how you can do your own DIY electric bus conversion so you can have the freedom and flexibility to travel as you wish and not be tied down to campgrounds and parks.
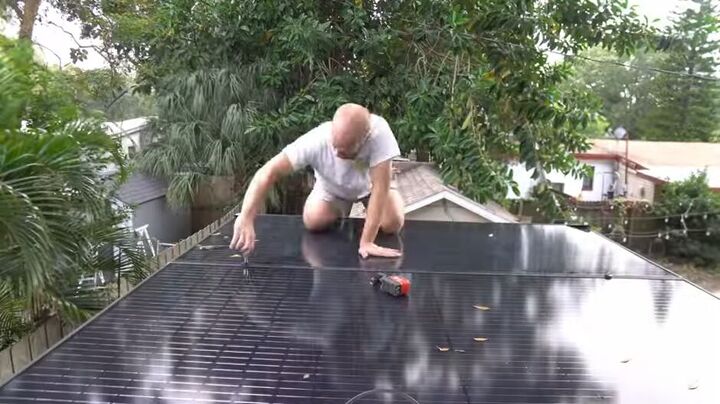
Firstly, you need solar panels. Personally, I think it’s smart to max out the number of solar panels you put on your roof. We have eight panels on top of this bus, which brings us to 3200 watts of clean energy on a 32-foot bus
Yes, you could rather have a small rooftop balcony but with an off-grid skoolie, the world is your oyster, and you can have a viewing deck from wherever you choose. By maxing out your solar panels you are gaining so much more.
The panels are two series; four parallel and all those go into the solar DACA or combiner box that we installed.
They are fused up there, but they go to a breaker box, that allows us to turn off the power from the solar panels and prevent it from coming in.
In addition to that, we have a lot of our DC distribution up top. We didn't think we could fit all the DC distribution in the lower cabinet, and we didn't want to bring all the cables from up top down low when we could just bring one cable from down low up top.
We've got two DC fuse locks in here.
This is a 24 to 12-volt step-down converter.
Right here, is this very cool gauge box.
The first two switches control the lights in case you lose the remote.
And the third switch controls the tank monitors.
There is a battery monitor, with a built-in Bluetooth connection, which allows you to remotely view the capacity of your battery as well as read it from your phone.
Moving on to the AC panel for our off-grid bus conversion. We used one that you need to jump power from two hotlines.
How this works is a cable runs from that solar breaker down through the wall right into the electrical cabinet...
And sends power to the solar charge controller, a 150-volt, 100-amp charger with Bluetooth that basically takes the current from your solar panels and organizes it in a manner that is best suited to your battery system.
From there we have two cables leading to our links distributor.
This links distributor is like a hardcore bus bar. It's attaching our charge controller, inverters, and batteries, and allowing us to manage them.
From the links distributor, power comes off and goes down into our battery bank.
But first, it goes through a smart shunt which communicates with the battery monitor in the upper cabinet. We've got the negative lead running to the shunt and then connecting to the links distributor. And we've got the positive lead going to a bus bar and to a transfer switch.
The main purpose of that switch is to allow you to turn off the power from your batteries. You want to be able to isolate the batteries and you need a big switch to do it.
From there, the links distributor sends the power it gets from the battery to the inverter. The inverter can basically run 2400 watts consistently and it can surge higher. It is all you need for this type of build. You can run two major appliances at the same time.
From the inverter, the 24 volts of DC power from the batteries is turned into 120 volts of AC power and sent to the AC distributor. That AC distribution box is basically an apartment box. It's like a sub-panel and it’s perfect for this application. It has eight circuits, which means that you can put 16 branches on it. When I build a bus, I tend to put between twelve and 16 circuits in.
From the batteries, 24 volts of power goes to the links distributor and then to our DC fuse blocks. We have two right here, which is probably overkill. The first is running the fridge and fans. You might not need a 24-volt and can rather run everything off a 12-volt.
From there we have a 24 to 12-volt converter and then a 12-volt DC seize block. This basically runs anything that was in the lower portion of the bus such as charging outlets and the DC pump. Everything upper, like the lights and the fans, are all up top.
This right here is a smart dongle. It is in addition to the inverter. It basically gives the inverter Bluetooth and allows you to monitor things that are happening with the inverter on your phone.
So, on our phone, we can look at what the inverter is doing, what the charge controller is doing, and what the battery bank is doing. We get to see the whole complete picture of our setup happening in real time.
Finally, there is a fan in the inverter that's pretty much always running. And we also have a fan that is sucking air through this cabinet . . .
into this cabinet and then out. Everything in here makes a bunch of heat, so you want to be able to release it somehow.
On another note, you can air condition your bus with solar power. You just need maxed-out solar panels and 6 to 10 100-amp lithium batteries.
DIY electric bus conversion
There is nothing cheap about what I have shown you, but you are essentially putting the entire electrical grid into your bus. I would encourage you to do it if you have the finances. You will not be tied to propane, generators, or campgrounds.
If you decide to go this route do your homework and make sure you are getting the best pricing.
Thanks so much for spending time here today and please leave comments letting me know what you think of the set-up of our DIY electric bus conversion.










Comments
Join the conversation