Super-Easy RV Christmas Tree Hack & Cute Festive Decor

Join us as we decorate the RV for Christmas. We're adding an RV Christmas tree, among other decorations, to bring the warmth and excitement of the holiday into our traveling home. We'll start with garland, decorative lighting, and the tree. Let's start with the Christmas tree in our RV.
I feel like that's going to be the biggest undertaking. So first of all, we have to remove the picture of the children we have hanging up because this is where we'll be creating our wall tree.
The way this tree works is because we don't have floor space to put a tree; we put it on the wall. We don't have a corner. We know many people that get those real skinny trees, and they fit in corners nicely.
Painter's tape outline
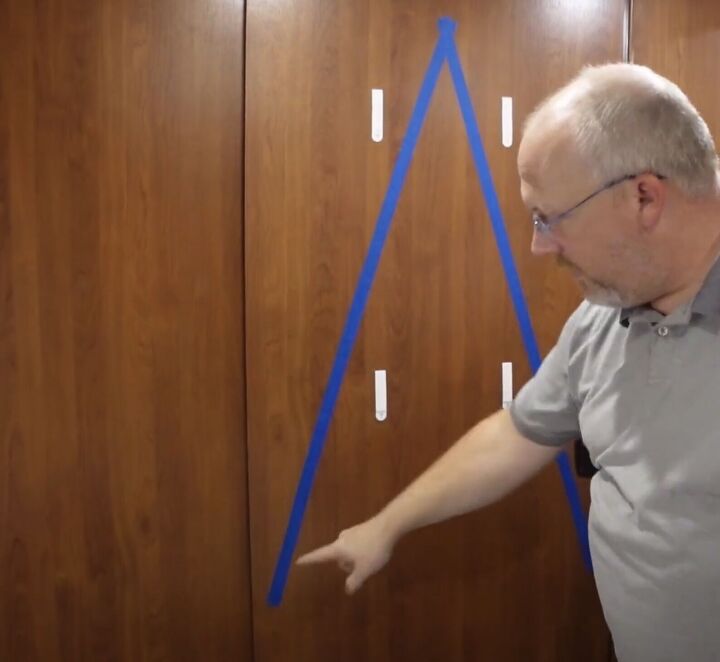
So what I'm going to do is to draw a triangle with painter's tape. Then we're going to put up a lot of command hooks. Once they're up, we're going to string garland from side to side in a big squiggle. It makes a simple tree.
I got my blue painter's tape template up.
Add Command Hooks
We will put Command Hooks at the top and alternate them down. So I just have to stick a whole lot of command hooks together.
I've got all of these command hooks stuck along the tape. What I did is I just marked every six inches on this side. So zero, six, twelve, eighteen, and so on. On the other side, I started at three, nine, twelve, fifteen, and so on. The garland will stagger as it comes down.
Attach the garland
So the next step is to start running the garland. We're a little more than halfway. So basically, we just wadded it up at the top, then hooked it on, and then I've just been going side to side and slotting it into the Command Hooks.
You can see I hook it in there and then pull it in the other direction. We like how this turned out. It looks really cute. So we'll finish it up, plug it in, and show you what it looks like.
All plugged in.
We had to go one extra row on the bottom just because of the length of the garland. We have the extra drooping down and plugged in.
The door has plenty of room to slide.
Add ornaments
We've got the natural woody-looking ornaments. We like the natural look.
Hang the lighted snowflake
The hole at the top of the snowflake is too tiny for the Command Hook, so I just had to use one of the twisties from the packaging. I can always replace it with a clear hook if it doesn't look great from the outside.
Unfortunately, the Command Hook fell off after a few minutes, so I used the suction cup hook that came with the snowfall to rehang it. It seems to work.
Add garland over the bed
The next project is just running the garland up and over. This is super, super simple. It's the same garland from Walmart.
We'll plug it into the outlets next to the bed, so the garland lights up.
Change the bedspread
Our final RV decorating project is to change the bedspread, which means moving the poor puppy. He has been snoring up a storm over here.
We simply changed the bedspread to a Christmas-themed comforter. This comforter, I think, is from Bed Bath and Beyond. It has little birds and a bunch of different trees. That's it for day three. That means it's bedtime. Let's turn all the lights off.
RV Christmas tree & decor
We hope you like our RV Christmas tree and decor. It's a great way to have a tree in a small space. What type of Christmas tree do you put in your RV? Share in the comments; we love to hear your ideas!












Comments
Join the conversation