6 Homemade Fertilizers That Are Better Than Store-Bought

Plant fertilizers can cost a leg and an arm, but guess what? You could actually make your own homemade fertilizer, that will be just as good, if not better. All the nutrients that your herbs, plants, and veggies crave are already available in places that you are probably overlooking - the grocery store or the pet shop, but especially your trash can.
Better yet, to make your own plant food, you do not have to be an expert gardener or a chemical engineer. Let me show you how to create six super easy, environmentally friendly, and basically free homemade fertilizers for plants.
Homemade fertilizers
At the beginning of your gardening journey, your biggest expense is not the seeds or the containers or even the starts, but the soil and then the accompanying fertilizers, which add up quickly because you have recurring applications of your fertilizer.
Let’s start by understanding how fertilizers work. The goal of any fertilizer is to supply your plants with the nutrients they need in readily available forms. There are organic and synthetic ones. The main consideration for most of us home gardeners is the cost and then the product's benefits over the long term. This is where organic fertilizers win out every single time.
The three main nutrients plants need to survive are nitrogen, phosphorus, and potassium. Together they make up the garden fertilizer combo known as NPK. This is how you make DIY plant food at home to give your plants all three:
1. Alfalfa hay tea
Alfalfa hay tea is a fantastic quick-release NPK fertilizer for your garden that can be cheaply found at a pet store or livestock supplier. It contains a naturally derived growth promoter 5% nitrogen, and a multipurpose fertilizer, its NPK values are usually 3-2-2.
It is excellent for roses, increasing crop height, reducing flowering and fruit drop, and promoting earlier crop maturity. Alfalfa hay is also an excellent compost accelerator and soil amendment.
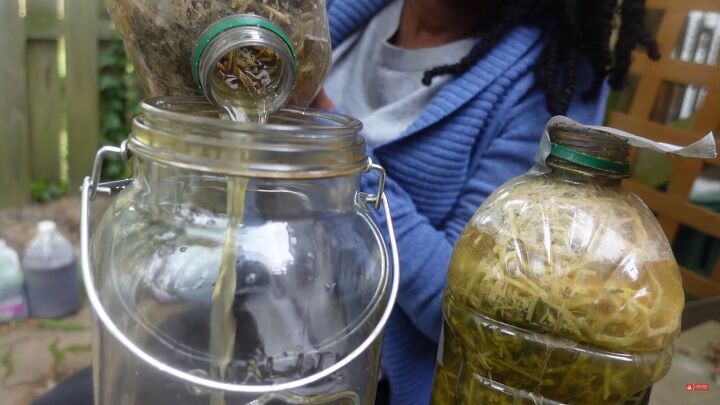
Get a container at least a gallon size or larger, ideally a five-gallon bucket. Then add unchlorinated water to fully cover the hay, and secure it with a lid. For the next 10-14 days, every day stir it with a stick or shake, to ferment and cultivate that good bacteria.
When the mixture is ready, just strain the solids from the liquids. Another option is putting the straw inside of the container, pouring the water over top, and when it is time to strain, all of the hay just stays in that container and is easy to pour out.
Use the fertilizer weekly on the leaves or directly to the soil.
2. Bone meal
Bone meal is extremely high in phosphorus and calcium, and is super expensive at stores. This is a must for your root plants, peppers, and tomatoes, as well as roses.
To separate your bones from the meat, store them in freezer bags, then submerge them in water and simmer over low-medium heat for 7-8 hours in a crock pot or on the stove. After that, it will be easy to remove the meat from the bones with your hands.
Next, rinse the bones under warm water and let them dry undisturbed and uncovered for about 30 days to get them completely dry and brittle. If time is not on your side, use a dehydrator or your oven on the lowest setting to dry for several hours.
Once the bones are dry, ground them into a powder with a blender or a mortar and pestle, and store in an airtight container.
3. Fishbone emulsion
Homemade fish emulsion is another nitrogen-rich fertilizer, and so much better than store-bought. You do not even need access to whole fish: you can also use herring fish like anchovies, sardines, and mackerel. By not adding any fillers, you will get significantly more bone, protein, oils and minerals for deep nutrition than in the store.
To make fish emulsion, simply repurpose a container and add a combination of fish scraps, including the bones and head if you have it. Next, add leaf litter and fill the container with water. Set outside and shake every few days for three weeks. Then dilute and use.
4. Banana powder
Banana peels provide an excellent source of potassium for your garden.
Stash your banana peels in the freezer until you have enough to fill 1-2 quart-sized gallon bags, then thaw them out. Cut them into ½-1 inch pieces and space them out on your dehydrator racks so that they are not touching at a temperature of around 120 for 5-7 hours.
By the end, they should be crisp, extremely dark, and snap easily. Wait for the peels to completely cool, then pulverize them in your food processor or blender for a powdered consistency.
Now whenever you need fertilizer, take one tablespoon of banana powder and a 16-ounce spray bottle filled with water, and wait until everything is dissolved. Apply liberally to your soil or directly on plants in indirect light.
5. Epsom salt
Epsom salt, usually used to treat minor aches and pains, provides a rich dose of magnesium that your tomatoes, peppers, and rose bushes use to produce their blooms, obtain optimal yields, and avoid blossom-end rot.
Additionally, Epsom salt has been shown to increase nutrient absorption, prevent transplant root shock, act as a natural pest deterrent, benefit new and established rose bushes, and effectively control slug invasions.
To create a liquid fertilizer, dissolve 1 1⁄2 tablespoons of Epsom salt in a gallon of unchlorinated water and use it as a leaf spray or directly to the soil twice a month.
6. Coconut water
Coconut water is an excellent source of potassium, as well as other minerals such as sodium, calcium, magnesium, and phosphorus. It is perfect to support your roots, leaves, flowering fruits, and veggies.
Moreover, coconut water is packed with cytokine hormones, which trigger cell division in the roots and shoots of plants, resulting in explosive growth, making it a favorite replacement for commercial growth formulas.
To use coconut water as a liquid fertilizer, dilute the coconut water by taking 3 1⁄2 tablespoons of fresh and raw coconut water with 4 cups of chlorine-free water. Spray on leaves and plant roots 1-2 times per week.
Homemade fertilizers
You have to try these DIY plant fertilizers at home. Do not forget to come back and comment on which one you loved most!











Comments
Join the conversation