How to Build a Shed in One Day in 7 Simple Steps

Today I am going to share a few tips on how to build a shed in one day. This is completely possible if you follow my advice and the weather plays along. Time to get started!
1. Building walls and trusses
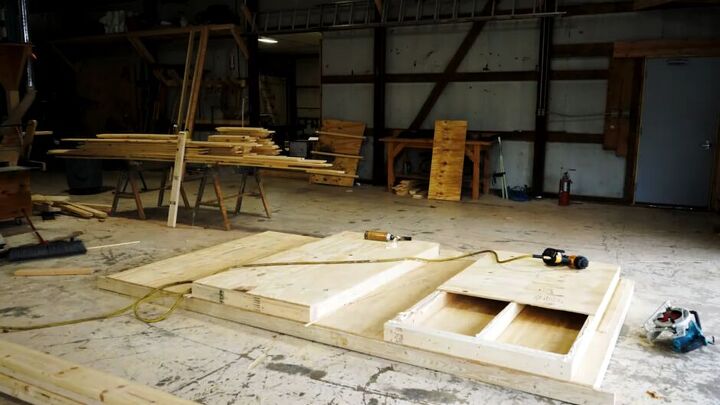
We started by building the walls and roof trusses in our shop and then brought everything out to the site where we assembled the whole shed.
These trusses can be rather complicated, but when you build them on a jig inside of a shop, it makes it a lot easier.
The middle of the truss has a 15-degree angle, then there is a 29-degree angle on the side, and you have an 18-degree angle when you get to the bottom.
We decided on a 12-foot-long span for the shed. To assure there is enough support to store items above, we used twelve-foot-long 2x6s on the bottom of the trusses and ran them long to the outside of the wall. By doing it this way you can be sure there is plenty of strength.
2. Sheathing
To make this process go a lot faster, we sheath the outside trusses when they're on the floor. It makes it a little heavier but when it comes to cutting all these complex angles, it's much faster to just glue the piece, lay it down, snap your lines and cut it, as opposed to trying to hold these pieces up after the gables are up.
3. Installing trim
When you skin the trusses, you want to make sure that you leave an inch and a half overhang on the bottom.
By doing this you create a seam with the siding material which gets covered with the trim and wraps all the way around the shed. We use a piece of trim that's three and a half inches wide.
This creates a bit of a soffit overhang on the outside for your drip edge after it’s sheathed.
By butting the trim up into the corners, it allows you to have some play in your sheeting so that all the lines stay straight.
4. Flooring
Now, let’s look at how to build a shed floor. We went with a concrete pad. We always put at least an inch and a half curb up the side of concrete before our wall plate. This will ensure that any spills from lawn equipment stay inside the shed and don’t seep onto the grass outside.
The curb also creates a barrier that's higher than the grade outside to guarantee that no water enters the shed. You want to make sure you use green board on the bottom plate if you want the shed to last a long time.
5. Securing the walls
When it comes to securing the walls, we use five-eight lag bolts that fit nicely inside the tension brackets. This tension bracket is typically used for a deck to keep things straight. We use them in the corners on each side of our door opening. By putting these bolts and fasteners here, it's going to ensure that this doorway stays straight and strong for years to come.
6. Installing the roof
Next, we put all the exterior soffit flashing and ice and water shield on and then put all the shingles on the roof. All our seams, whether they're vertical or horizontal, get hidden behind our facial board. This allows for a very fast assembly.
7. Final touches
The shed is now primed and what we typically do is paint a traditional white on the trim and then whatever the color the customer chooses for the shed. We also usually install a gable vent for air circulation on one side. Then whatever side the sun primarily faces, we'll cut a hole and install a piece of plexiglass with a frame, just to give some lateral light right into the structure.
How to build a shed in one day
So, that’s how we build a shed in one day. I hope this has helped you understand how to build a shed from scratch, so you can get started on your own. Any questions, leave them in the comments below and I’ll be happy to answer them. See you next time!












Comments
Join the conversation
How much for you to come to my house and get started!
Overly simplistic and generally vague directions. How many guys did it take for “one day”