3 Easy DIY Fall Decor Ideas: Decorating for Fallon a Budget

My name is Tish of Allens Ever After and I’m going to share my DIY fall decor ideas. I'm going to put together three DIYs and I'm going to show you how I decorated my spaces with the DIY fall decor I created. They are easy and affordable so join me for fall decorating on a budget!
Fall table centerpiece
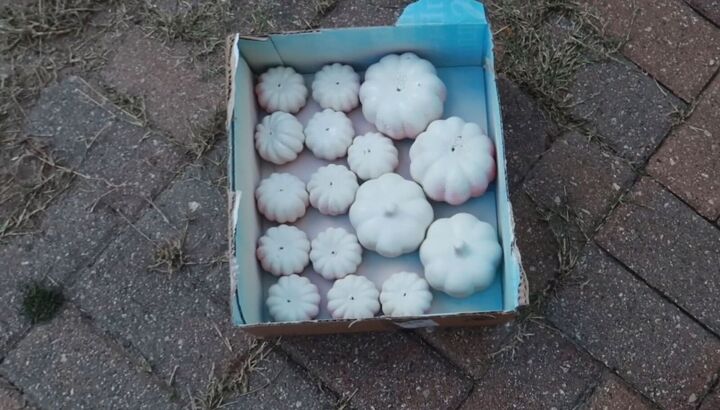
My first DIY is a fall-inspired centerpiece for my formal dining room table. I knew that I wanted white pumpkins incorporated throughout and I couldn't find any within my budget. I solved that problem by buying all of these from Dollar Tree and spray-painted them white.
Before I paint them I will be removing all of the stems because to me, brown looks great with white.
1. Spray painting the pumpkins
I have all of the pumpkins lined inside a cardboard box. I’m going to take them outside and spray-paint them white. The color paint I used is Rustoleum’s, Heirloom White. It took about three coats to create the look that I envisioned.
2. Painting the crates
Next, I’m going to create the actual centerpiece using four crates from Dollar Tree. I bought this acrylic paint from Walmart for only 50 cents and it's called antique white. I painted two coats, letting them dry in between coats. This paint dries fast and that's one thing that I love about this paint from Walmart.
3. Gluing the crates
I could not get this glue to come out of the bottle and I was not about to let it stress me out, so I opened the top and poured it onto a paper towel, and used a paintbrush to brush it onto the box.
Once the boxes were glued I secured them with binder clips. You can buy these from your local Dollar Tree. I used two clips per box and this is how the box looked after I placed all of the binder clips.
4. Filling the crates
Now it's time to put everything together. I started with a table runner from Ross. Next, I gather all of my flowers that I purchased from Dollar Tree and Walmart and cut the stems individually. I ended up using two bags of floral moss that I bought from Dollar Tree to fill in the empty spaces in the box.
I have three candle holders and three candles, all purchased from Dollar Tree. Next, I'm going to be using floral foam that I purchased from Dollar Tree, they come in four in a pack. I'm filling in the empty spaces with floral moss, and this part can get messy. Not a little, but a lot, however, it’s nothing that a good old vacuum cleaner can't fix.
5. Placing the candle holders and candles
Next, I'm going to place the candles inside the candle holders and place them on top of the floral foam. Now onto the fun part, bringing the centerpiece to life.
6. Bringing it all together
I'm taking all of my flowers and my painted pumpkins and I'm placing them throughout the centerpiece. They all have picks on the end of them so I can just slide them into the floral foam and that will keep everything in place. I bought ribbon from Dollar Tree and I thought that it went perfectly with the table runner so I'm going to hot glue it around the centerpiece.
Fall DIY candle stands and holders
Now on to fall DIY number two. For the second DIY fall decor I'm going to be creating two candle stands for my fireplace mantel. I'm going to be starting with two packs of glass containers from Dollar Tree and there are four in each pack.
1. Spray painting the glass containers
I then took some black spray paint that I had around the house and spray painted the glass containers. The reason I chose black is that I just created this DIY wall clock and they have black picture frames so I figured that the black candle stands will tie in with the DIY wall clock. I sprayed the glass with one coat of black paint.
2. Creating the candle stands
I decided to go ahead and create the candle stands, then once I created the candle stands I'm going to go back in for the second and third coats of black paint on the glass containers.
I'm gluing the glass containers together with the E 6000 glue before adding the additional coats of paint. You can create however many tiers you want.
3. Completed candle stands
I decided to do three for one stand and two for the other so that is not too matchy-matchy.
4. Adding trim
I found this nautical rope at Dollar Tree and figured this would add that fall touch to the candle stands. I hot glued the rope around the glass containers which I also purchased from Dollar Tree. I ended up using the entire pack of nautical rope around the vase.
5. Combine candle stands with glass containers
The next thing I did was add the glass container to the candle stand. I used E 6000 glue in addition to my hot glue gun to secure the glass to the candle stand. I repeated the same process for the second candle stand and this is how everything turned out.
This is how my candle stands look with the glass candle holders attached.
6. Finish setting the display up
To surround the candle stands, I used leftover pumpkins from the DIY centerpiece from earlier in the video. I used four pumpkins that I painted letters on to spell the word fall and I used six pumpkins to spell the word Gather.
Candle stand
For our final DIY project I created a second candle stand. This is by far the easiest of the three DIY projects.
1. Gluing two candle stands
I glued two candle stands together using E6000 glue.
2. Gluing the candle holder
I glued the candle holder on top of the candle stands. Everything seen here was purchased from Dollar Tree.
3. Finished candle stand
To finish this project I'm going to place two candles inside the candle holders.
DIY fall decor ideas
I love decorating for fall so I hope you enjoyed these fall DIY decor pieces. Fall is by far my favorite time of year, and just saying the words pumpkin spice, harvest, corn maze, and hay rides send me into fall heaven. What is your favorite thing about fall? Let me know in the comments!









Comments
Join the conversation
I loved your fall decor projects, and the centerpiece was my favorite!. I think I’ll try this one. Thanks😊
Yes I will try this. It looks so pretty.
Thank you,
Shirley B.