3 DIY Dollar Tree Spring Decor Projects With a Rustic Farmhouse Theme

Today I'm working on DIY Dollar Tree spring decor. I have four rustic farmhouse decor projects using affordable Dollar Tree items. Spring decor is always welcome after a long, dreary winter to brighten up our home; these easy crafts are just what we need.
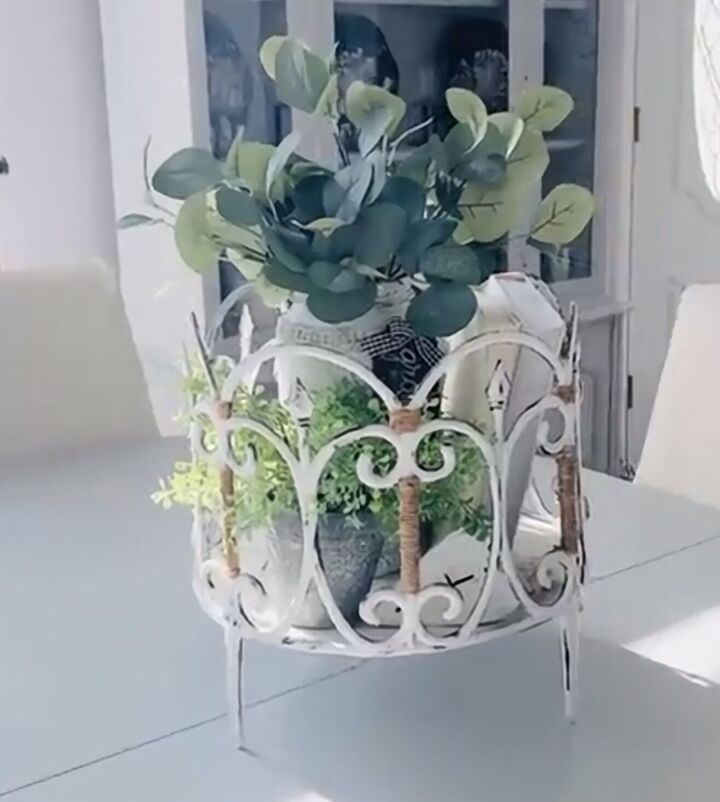
1. Wood finish charger planter
We will use a wood-finish charger, two plastic fence pieces, and jute twine. Slide those little pins into the slots and attach them on one side. Take a utility knife and cut off one of the legs where the two come together.
Cut off one section of those little loop de loops on one side. On the other side, remove that attaching mechanism and put them together temporarily using a chenille stem.
Once I get it all together, I will take it outside to my painting station to paint it all white.
After everything is dry, take jute twine and wrap that around the two places where the fencing comes together to give it more security. Do that on the smaller bars in between, on every other one.
Next, take some chalk paint and get that all nicely distressed so it looks like raw iron is chipping and wearing away.
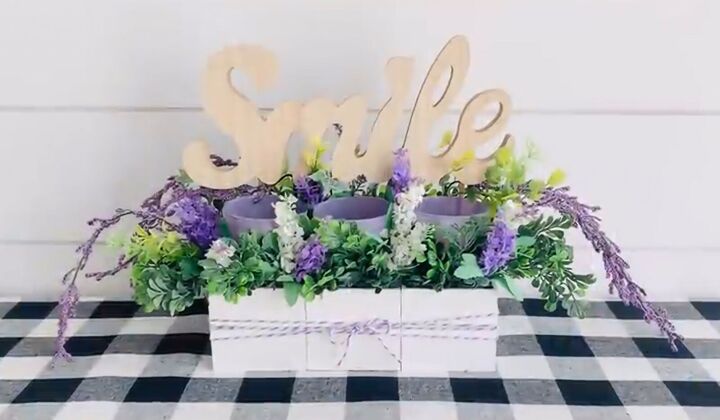
2. Lavender vase
We'll be using three wooden boxes, three lavender votives, lavender and white cotton twine, floral foam, and flowers in different shades of purple and lavender.
First, pull out that inside box because we won't use those in this DIY. Take chalk paint in white and paint those boxes on the outside and top rims. Put the boxes together using E 6000 and hot glue, pressing them together tightly.
Take the floral foam and cut that down into the right size to fit at the bottom of the boxes and glue that down. Take another piece and put that in the middle so the votives can be a little bit higher.
Start filling the crate with some greenery. Place those all the way around, then take some lavender stems, cut them apart, and add them in. I used four different colors, cut apart amaranth stems, and put three on one side and three on the other.
Now take cotton twine and wrap that around the base about four times, then tie a bow in the front.
I wanted to give my piece a bit more height, so I found this smile sign from Dollar Tree, and I used a bamboo skewer to attach it to the back in three places and poked those into all three boxes.

3. Spring lavender wreath
We will use a twelve-inch wood blend wreath and some more purple lavender stems. Cut off the bottom parts of the stems and stick them between the wood pieces of the wreath form; take some paddle wire and attach those to give it more security.
First, use all of the medium-colored lavender stems, then go back in with some white stems and then use some darker lavender stems.
Cut those apart and place them intermittently throughout the wreath. I ended up using a total of seven medium-colored lavender stems, five white ones, and three dark lavender stems.
Once the stems are in place, cut off that excess paddle wire. Take some Dollar Trees burlap and lace ribbon, wrap that around the top part of the wreath, and then fold over the raw edge and hot glue that down, so it's nice and clean.
I have a thumbtack holding it in place on a beautiful old window.
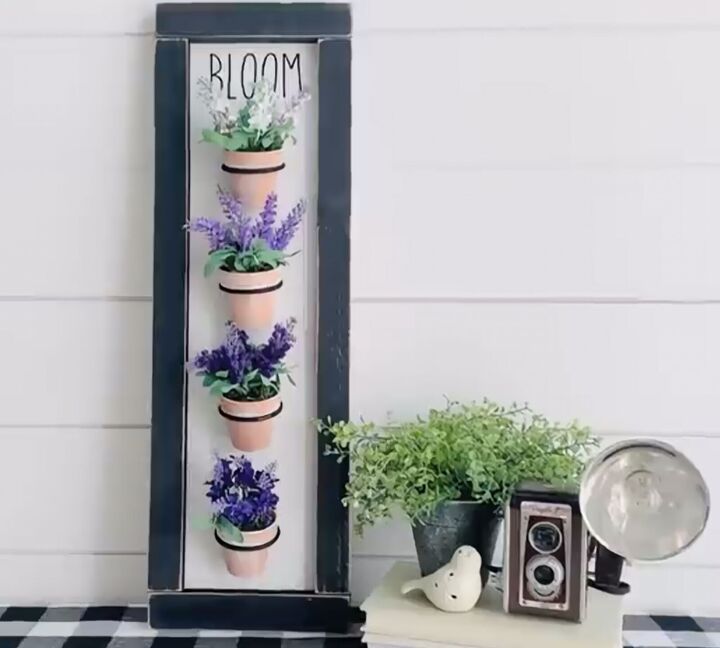
4. Wooden sign planter wall hanging
We'll use a long wooden sign, four mini terracotta flower pots, and four plastic bracelets for our final Dollar Tree spring DIY. You can use any of the signs that you can find at Dollar Tree, but the longer, the better for this project.
I used my Cricut spatula to pull that paper scarecrow up. Next, take chalk paint in white, paint the backside of the sign, and get that all nicely covered.
Take the leftover paint that's still on the paintbrush and lightly go over the terracotta pot. Measure five inches between each of those top holes, so you know where to place your pots. Take a drill and make two little holes using the smallest drill bit you can find.
Next, take the bracelets, and using chalk paint, get those nice and black to resemble something like metal. If you go back and tap on them a little bit when they're still wet but mostly dry, you'll get that texture that looks uneven and bumpy.
Use scrap floral foam, cut it down to fit inside the pots, and then glue them in to stay nice and secure. Add some floral moss and glue that to the top of each of those pots.
Using four different shades of the lavender stems, do an ombre effect. Start with the darkest shade at the bottom and gradually move up to the lightest at the top. Use some scrap one by two pieces of wood and place them on the sign and see how long you need to make them. You'll want to leave a gap at the top and the bottom so your frame can attach to your board.
Stack one on top of the other to get the same size pieces, and your frame will be nice and even. Take chalk paint in Ink, and paint all of the boards. Once they dry, use a sanding block and sandpaper and get that all nicely distressed.
On the back side, use my staple gun to attach them from the back. Next, place the board on the back of the frame. I used duct tape to secure the board to the back of the frame.
Use a chenille stem, cut it in half, place it around the bracelet, and then stick those into each of the holes in the board. Twist it on the back, and those become our little pot hangers. Place the flower pots in each holder, going from the darkest at the bottom to the lightest at the top.
DIY Dollar Tree spring decor
I love how all of my spring craft projects worked out. What spring DIY projects are you working on? Share in the comments below.


Comments
Join the conversation